Back to Basics: Slit Lamp 101
Back to Basics: Slit Lamp 101
Do you avoid the slit lamp at all costs because it intimidates you? Start getting comfortable with the components of the Weiss SL 120 Slit Lamp in this guide. Don't have this kind of slit lamp? Then check out a prior post which covers another commonly utilized slit lamp in the ED. Tune in next week for tips on how to perform the slit lamp examination.
There are four main components to the slit lamp:
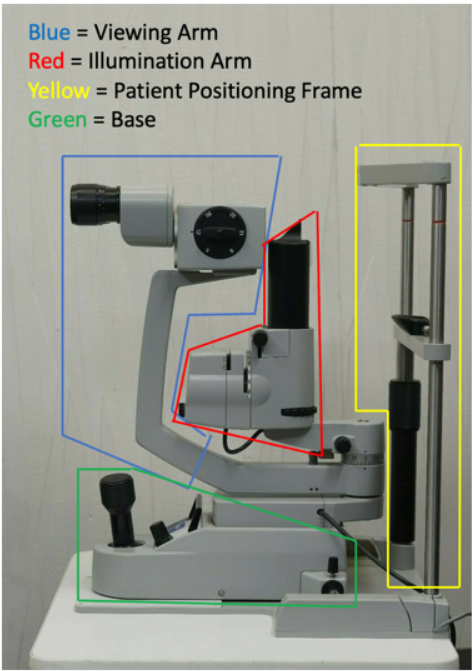
THE VIEWING ARM:
Think of this part as a microscope.
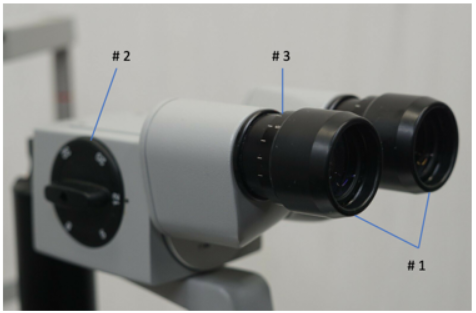
#1 - Oculars - Adjust for your personal interpupillary distance
#2 - Magnification Dial - Can set to 5x, 8x, 12x, 20x, or 32x
#3 - Focusing Ring - Accounts for your personal refractive error. If you have 20/20 vision or correction lenses, it should be set to 0.
THE ILLUMINATION ARM:
This part is your light source. It can be swung 180 degrees side to side to allow for examination from the temporal or nasal side.

#4 - Beam height - Move to the right of examiner > shorter.
#5 - Beam widgth - Move to the right of the examiner > smaller
#6 - Color of light - 3 options: White (used for most of the exam), Cobalt blue (used with fluorescein exam), Green (aka red free filter; allows blood vessels to appear black; rarely used by ED doc)
THE PATIENT POSITIONING FRAME:
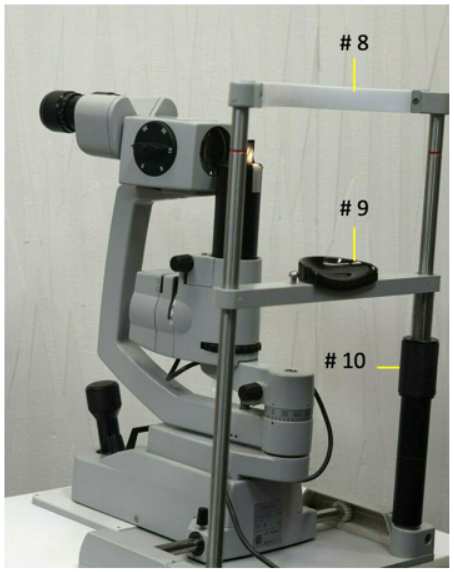
#8 - Forehead Strap (*always make sure patient's forehead is against this or you will NOT be able to focus the slit lamp!*)
#9 - Chin Rest
#10 - Height Adjustor for the chin rest - twist this until the patient's lateral canthus is aligned with the red line on the supporting rod of the patient positioning frame
THE BASE:
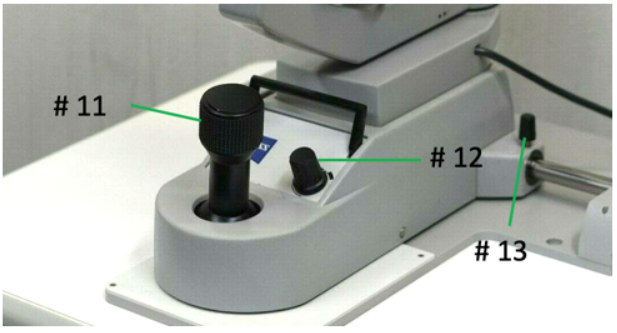
#11 - Joystick - Allows movement of the viewing & illumination arms in tandem. Large movements forward & backward are often required to obtain initial focus which will require pressure on the joystick to move the entire base. Smaller microadjustments can be made with smaller movements of the joystick (without moving the base). Movement side to side and up & down (the latter performed by twisting the joy stick) allow for you to examine different aspects of the eye (temporal to nasal, upper to lower lid, etc).
#12 - Light Brightness Knob - Most models have this component on the illumination arm but the Weiss SL 120 has this on the base. Turn right > brighter
#13 - Locking Knob - May need to unlock to move the base. Put the lock on if you are moving the whole slit lamp (i.e. in and out of the patient's room)
PREPARING/POSITIONING

#14 - Table Height Adjustor - To increase patient comfort (and therefore compliance), lower or elevate the table as needed. You may need to adjust your own chair height accordingly so try to use a stool.
#15 - Power Button - Make sure you're plugged in!